Support BCN3D Sigma Maintenance
In this section, you will learn which procedures have to be carried out to give the Sigma the proper maintenance. It is extremely important to follow these guidelines to make sure your printer performs at its maximum capabilities.
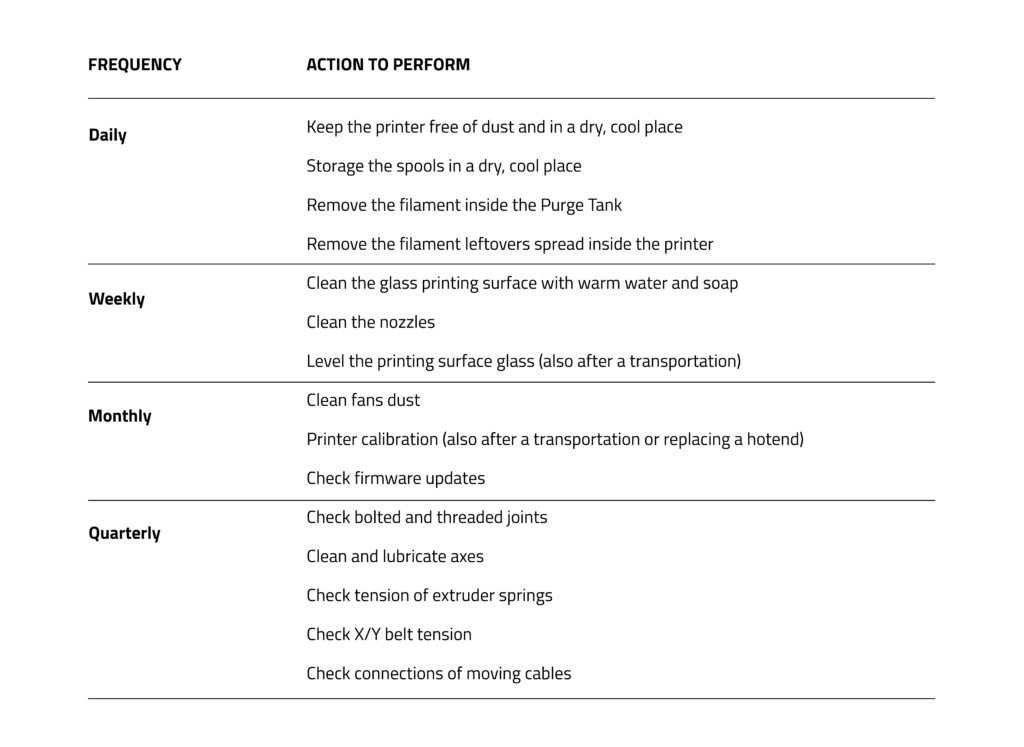
Maintenance plan
Here is the chart of the different procedures to accomplish and the frequency suggested.

Change the hotend
The Sigma is equipped with two 0.4 mm hotends. However, it is possible to change the hotend in order to increase the versatility of the 3D printer. Every part has its particularities and needs, so it’s wise to choose the proper hotend for each print job. The size of the hotends compatible with the Sigma is: 0.3 / 0.4 / 0.5 / 0.6 / 0.8 / 1.0 mm. You can find them in our store. Small nozzles are ideal for detailed models. Instead, big nozzles allow users to fabricate more resistant parts or for rapid prints.
In the following manual you will find a detailed step by step guide on how to change the hotend.
Lubricate and clean axes
Periodically, according to the Maintenance Alerts via LCD screen, it is recommended to clean and grease the axes of the Sigma with the lubrication kit to ensure a smooth and precise performance of its mechanical components. You can find the Lubrication Kit in our store.
how-to-lubricate-and-clean-axes-sigma
In the following manual you will find a detailed step by step guide on how to lubricate and clean the axes of your printer.
Clean the hotend
It is recommended to clean the hotend periodically and, especially, every time you switch materials. Ideally, use a piece of nylon filament to perform this operation.
In the following manual you will find a detailed step by step guide on how to clean the hotend of your printer.
Installing shims
Shims are elements that mechanically correct the Z offset when printing in Mirror or Duplication mode. These printing modes are available for the Sigma R19. For those Sigma users who have previous versions must update their firmware to 2.0.0 or higher and get the shims to have them available and functional.
In these modes both toolheads work simultaneously, so it is key important to make sure both nozzle tips are exactly at the same height. Due to manufacturing and assembly tolerances, the Z offset between tips can be up to 0.5mm. BCN3D printers automatically correct the offsets when printing in Mirror/Duplication Modes. However, this correction distorts the first layer of the model by repeating it as many time as needed. To avoid such distortion there are different options:
1. Enable raft in BCN3D Cura: The offset will be corrected in the first layers of the raft, so the model won’t be affected by any Z offset.
2. Install shims to mechanically correct the Z offset: Printing a raft takes time and spends material. For those users planning to use frequently the Mirror or Duplication modes, it is highly recommended to install the shims when it is suggested during the Printer Calibration process.
How to install it?
In the following manual you will find a detailed step by step guide on how to install the shims on your printer.
Update the firmware
At BCN3D Technologies we want you to have a great printing experience, and to achieve this we are continually working to create new firmware upgrades for our printers. Follow this
How to handle and storage filaments
The Sigma R19 printer gives the best printing results when printing with BCN3D Filaments, although it accepts many other materials from other manufacturers.
BCN3D Filaments are industrial-grade materials designed to deliver outstanding results for BCN3D printers. BCN3D Filaments, formulated to ensure the highest print quality, are common polymers in several industries and cover the majority of the technical applications. Those filaments are: PLA, ABS, Nylon, PET-G, PVA, TPU and Composites. Visit our dedicated website for detailed information about each one. Furthermore, you will find the Technical and Safety Datasheets of all of them.
The optimal conditions to storage your filaments in a proper condition to ensure good prints is to store them in a dry and cool place with a resealable bag and out of direct sunlight, ideally between 10 ºC and 30 ºC.
To ensure good adhesion between the printing surface and the 3D printed part, you will need to use an adhesive product that will be applied to the printing surface before start printing. For general materials, we recommend using the glue stick included with the printer or a generic lacquer such as 3DLac. However, for technical materials such as ABS or PET-G, we recommend Dimafix adhesive.
Nylon and PVA plastic are hygroscopic, that means it readily absorbs water from the air. Make sure they are dry before printing. Place them in an oven or in a dehydrator at 50 ºC for 6 to 8 hours. After drying, store it in an airtight container with desiccant.
We recommend using the Sigma R19 enclosure when printing with technical materials such as ABS, Nylon or PET-G. It provides a constant interior temperature to prevent warping and protects your working environment from potentially harmful particles thanks to the HEPA filter.
